
19 Aug STEM Challenge: Cirque Carnival
Next week’s Summer Program Theme is Cirque Carnival and you are going to be participating in some fun carnival-themed activities! Get excited for next week with this paper roller coaster activity.
Visit our blog every Thursday to see our latest STEM challenge and share your creations on social media using #CMMSSTEMChallenge or by emailing marketing@childrensmanor.com. Be sure to submit your photos to us by Monday, August 23rd.
This week, there are two ways that you can do this challenge. Feel free to do both, or just one!
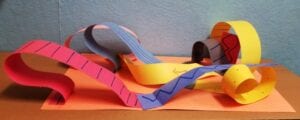
Challenge #1: Basic Paper Roller Coaster:
Materials:
-
-
- Construction paper or regular paper
- Scissors
- Glue
- Markers
-
Instructions:
-
-
- Choose a piece of construction or other paper to use as the base of your roller coaster.
- Cut different length strips of paper to use as your coaster tracks. You can draw lines on your strips to mimic roller coaster tracks.
- Once you have decorated your strips, begin to glue the edges of the paper to your base, one at a time. You can add flips, curves, and turns as you connect each strip to the last.
- Continue this process until you have built a roller coaster covering your whole page!
-

Challenge #2: A Working Paper Roller Coaster
This build is a bit more challenging, but we know you can do it! Before you begin, please watch this video of how to do this activity: https://youtu.be/U7XYzPfutBs. To build this roller coaster, you will need to print or recreate this Roller Coaster Tracks Template.
Materials:
-
-
- Roller Coaster Tracks Template Printed or Re-created
- Paper
- Tape
- Scissors
- Cardboard or any type of base
- Marble or small round object
-
Instructions
-
-
- Let’s take this build one step at a time! Before you start building the entire roller coaster, try building the individual track segments. Print this template and cut out the pieces, or recreate your own with a pencil and ruler.
- Before you start building, plan out a design for your roller coaster. Draw your design on paper. Figure out how many supports and pieces of track you will need. Make sure your marble starts at the top of a hill.
- Using a piece of cardboard as a base, assemble your track according to your plan. Tape the track segments together end-to-end to connect them.
- Place the marble at the top of your track and let it go. Watch carefully.
- If the marble made it the whole way to the end, try making your track longer by adding more pieces.
- If your marble didn’t make it to the end, try to figure out why. Is there a spot in your track where the marble got stuck? Was the marble going too slow to make it through a loop? If necessary, make changes to your design, like making the curves more gradual or the starting hill taller, and try again.
-
What happened?
If you made your starting hill tall enough, and all the curves and loops of your roller coaster were gradual, your marble should have been able to get all the way to the end. However, if your coaster had any sharp turns or corners, your marble might have gotten stuck. If you tried to have your marble go up a hill or through a loop that was taller than the hill it started on, it wouldn’t make it all the way through. Why not?
The answers to these questions have to do with energy and gravity. Roller coasters are all about physics! Unlike other vehicles like cars and trains, roller coasters do not have an engine that moves them forward along the track. Instead, they rely on gravitational potential energy, which they gain by initially being towed up a large hill. Learn more here.
We can’t wait to see your roller coasters! Please be sure to tag us on social media, using #CMMSSTEMChallenge, or email your photos to marketing@chidrensmanor.com.
Idea and photo credits: Science Buddies & Teaching Ideas.